"Remote API"의 두 판 사이의 차이
| 5번째 줄: | 5번째 줄: | ||
<p><img src="/data/wiki/2015-05-29/1432898700.png" alt="" /></p> | <p><img src="/data/wiki/2015-05-29/1432898700.png" alt="" /></p> | ||
<p> </p> | <p> </p> | ||
| − | <h3>1.1. | + | <h3>1.1. Interface</h3> |
<h4>1.1.1. Application -> TRACE32 API</h4> | <h4>1.1.1. Application -> TRACE32 API</h4> | ||
<p><img src="/data/wiki/2015-05-29/1432898787.png" alt="" /></p> | <p><img src="/data/wiki/2015-05-29/1432898787.png" alt="" /></p> | ||
| 19번째 줄: | 19번째 줄: | ||
<p> </p> | <p> </p> | ||
<p><strong><br /> </strong></p> | <p><strong><br /> </strong></p> | ||
| − | <h2>2. | + | <h2>2. API build 하기</h2> |
| − | <h3>2.1. | + | <h3>2.1. API file 구성</h3> |
<p> 두 개의 C source file과 하나의 header file 로 이루어져 있다. (C:\T32\demo\api\capi\src)</p> | <p> 두 개의 C source file과 하나의 header file 로 이루어져 있다. (C:\T32\demo\api\capi\src)</p> | ||
<p>① hlinknet.c : TRACE32 socket interface 하는 source file.</p> | <p>① hlinknet.c : TRACE32 socket interface 하는 source file.</p> | ||
| 37번째 줄: | 37번째 줄: | ||
<p><strong>cc -o applic hlinknet.o hremote.o applic.o</strong></p> | <p><strong>cc -o applic hlinknet.o hremote.o applic.o</strong></p> | ||
<p><strong> </strong></p> | <p><strong> </strong></p> | ||
| − | <h3><span style="font-size: 1.17em;">2.3. | + | <h3><span style="font-size: 1.17em;">2.3. TRACE32 Software 준비</span></h3> |
<p> TRACE32 S/W는 remote control 을 사용 하기 위해 API와 같은 환경설정을 해야 한다. “config.t32” 파일을 아래와 같이 수정하도록 한다.</p> | <p> TRACE32 S/W는 remote control 을 사용 하기 위해 API와 같은 환경설정을 해야 한다. “config.t32” 파일을 아래와 같이 수정하도록 한다.</p> | ||
<table border="1" cellspacing="0" cellpadding="0"> | <table border="1" cellspacing="0" cellpadding="0"> | ||
| 78번째 줄: | 78번째 줄: | ||
<p> Port Number 는 API 통신을 위해 사용하는 UDP port 를 넣어준다. Default 는 20000이다. 이미 port 20000이 사용 중이기 때문에 20000보다 크게 설정한다.</p> | <p> Port Number 는 API 통신을 위해 사용하는 UDP port 를 넣어준다. Default 는 20000이다. 이미 port 20000이 사용 중이기 때문에 20000보다 크게 설정한다.</p> | ||
<p> </p> | <p> </p> | ||
| − | <h3><span style="font-size: 1.17em;">2.4. | + | <h3><span style="font-size: 1.17em;">2.4. API 환경 설정</span></h3> |
<p> T32_Config(), T32_Init() 과 T32_Attach() function 들에 의해서 API 환경 설정을 한다. T32_Config() 는 두 개의 변수를 가지며 node name과 port number이다. T32_Init() 은 통신 채널 셋업 설정을 한다. T32_Exit() 는 connection을 끊을 때와 application의 terminating 전에 항상 호출된다.</p> | <p> T32_Config(), T32_Init() 과 T32_Attach() function 들에 의해서 API 환경 설정을 한다. T32_Config() 는 두 개의 변수를 가지며 node name과 port number이다. T32_Init() 은 통신 채널 셋업 설정을 한다. T32_Exit() 는 connection을 끊을 때와 application의 terminating 전에 항상 호출된다.</p> | ||
<p> 나머지 function들은 C:\T32\pdf\<strong>api_remote.pdf</strong>에서 확인 할 수 있다.</p> | <p> 나머지 function들은 C:\T32\pdf\<strong>api_remote.pdf</strong>에서 확인 할 수 있다.</p> | ||
| 361번째 줄: | 361번째 줄: | ||
<p> </p> | <p> </p> | ||
<p> </p> | <p> </p> | ||
| − | <h2><span style="font-size: 1.5em;">4. | + | <p> </p> |
| − | < | + | <h2><span style="font-size: 1.5em;">4. compile 환경설정</span></h2> |
| − | < | + | <h3>4.1. compiler 설치</h3> |
| + | <h3>① Visual Studio 2005 Professional 을 설치한다. (Visual Studio 2005 설치가이드 문서를 참고한다.)</h3> | ||
<p>② 설치 후에는 C:\Program Files<x86>\Microsoft Visual Studio 8 폴더를 확인 한다.</p> | <p>② 설치 후에는 C:\Program Files<x86>\Microsoft Visual Studio 8 폴더를 확인 한다.</p> | ||
<p>* 다른 compiler를 이용할 경우 GCC, Sun Compiler를 이용할 수 있다.</p> | <p>* 다른 compiler를 이용할 경우 GCC, Sun Compiler를 이용할 수 있다.</p> | ||
<h1> </h1> | <h1> </h1> | ||
| − | <h3>4.2. | + | <h3>4.2. makefile 설정</h3> |
<p>① make file에는 설치된 compiler 환경에 따라 경로 설정을 변경해 준다.</p> | <p>① make file에는 설치된 compiler 환경에 따라 경로 설정을 변경해 준다.</p> | ||
<p>② 경로 사이에 공백이 사이에 있을 경우 “” 로 처리해준다.</p> | <p>② 경로 사이에 공백이 사이에 있을 경우 “” 로 처리해준다.</p> | ||
| 429번째 줄: | 430번째 줄: | ||
</tbody> | </tbody> | ||
</table> | </table> | ||
| − | <h3>4.3. | + | <h3></h3> |
| + | <h3>4.3. build 하기</h3> | ||
<p>① cmd를 이용해 build 한다.</p> | <p>① cmd를 이용해 build 한다.</p> | ||
<p>② Source가 설치 된 경로로 이동해 nmake 하면 된다.</p> | <p>② Source가 설치 된 경로로 이동해 nmake 하면 된다.</p> | ||
| 435번째 줄: | 437번째 줄: | ||
<p><img src="/data/wiki/2015-05-29/1432899116.png" alt="" /></p> | <p><img src="/data/wiki/2015-05-29/1432899116.png" alt="" /></p> | ||
<p> </p> | <p> </p> | ||
| + | <h2></h2> | ||
| + | <h2></h2> | ||
| + | <h2></h2> | ||
<h2><span style="font-size: 1.5em;">5. API 사용하기</span></h2> | <h2><span style="font-size: 1.5em;">5. API 사용하기</span></h2> | ||
| − | <h3><span style="font-size: 1.17em;">5.1. | + | <h3><span style="font-size: 1.17em;">5.1. TRACE32 start</span></h3> |
<p>① config.t32 수정 후 t32marm.exe 를 실행한다. (C:\T32)</p> | <p>① config.t32 수정 후 t32marm.exe 를 실행한다. (C:\T32)</p> | ||
<p><img src="/data/wiki/2015-05-29/1432899208.png" alt="" /></p> | <p><img src="/data/wiki/2015-05-29/1432899208.png" alt="" /></p> | ||
| 528번째 줄: | 533번째 줄: | ||
<p> </p> | <p> </p> | ||
<p><img src="/data/wiki/2015-05-29/1432899300.png" alt="" /><img src="/data/wiki/2015-05-29/1432899303.png" alt="" /></p> | <p><img src="/data/wiki/2015-05-29/1432899300.png" alt="" /><img src="/data/wiki/2015-05-29/1432899303.png" alt="" /></p> | ||
| − | |||
<p> </p> | <p> </p> | ||
<p> </p> | <p> </p> | ||
2015년 5월 29일 (금) 20:52 판
Introduction
TRACE32는 Application Programming Interface (이후로 API로 표시) 를 이용하여 외부 application 으로 target을 control 과 debugging 가능하다.
API는 C library와 C function interface로 control 할 수 있다. API 는 socket interface를 이용해 TRACE32 application과 통신한다. (TRACE32 단독으로는 안됨) command chain은 다음과 같다.
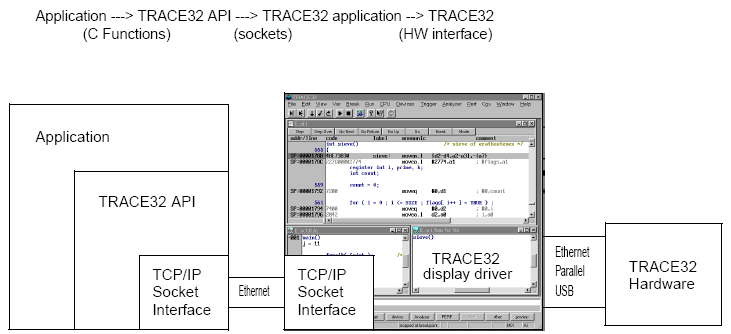
1.1. Interface
1.1.1. Application -> TRACE32 API
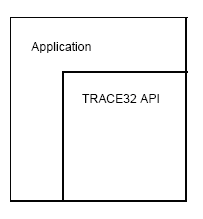
Application은 기본 C function을 사용한다.
1.1.2. TRACE32 API -> TRACE32 display driver
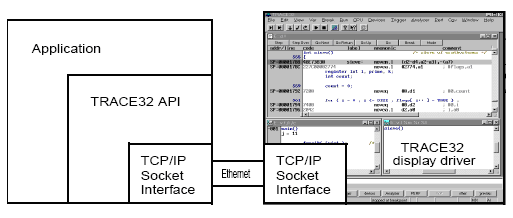
TRACE32 S/W (PowerView) 는 socket interface 기반으로 통신한다. 통신을 위한 네트워크 연결을 사용 할 때는 API를 포함한 application control 과 두 개의 다른 host가 있어야 한다. 이 연결 방법은 제대로 된 방법이 아니다. 기본적으로 API 내에는 error detection을 해주는 네트워크 설정이 없기 때문이다. 그렇기 때문에 같은 host에서 running 할 수 있는 방법을 추천한다.
1.1.3. TRACE32 display driver -> TRACE32
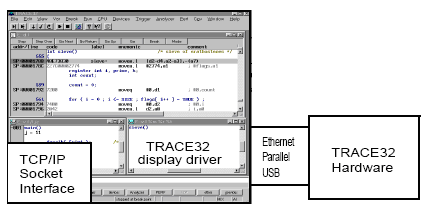
S/W (PowerView)는 API가 TRACE32 H/W를 통해 요청하는 루트로 되어있다. Interface 방법은 세가지 중 (Ethernet, parallel, USB) 하나를 선택할 수 있다.
2. API build 하기
2.1. API file 구성
두 개의 C source file과 하나의 header file 로 이루어져 있다. (C:\T32\demo\api\capi\src)
① hlinknet.c : TRACE32 socket interface 하는 source file.
② hremote.c : 모든 API function 을 가지고 있는 source file.
③ t32.h : API header file.
2.2. API와 Application의 연결
API 를 사용 할 때는 header file은 “t32.h”에 반드시 포함된다. Source의 시작을 의미한다.
#include “t32.h”
Compile 과 linking 할 때 API file 은 application의 source를 반드시 handling 한다.
cc -c hlinknet.c
cc -c hremote.c
cc -c applic.c
linker는 “cc”로 object file은 “o”로 표현된다.
cc -o applic hlinknet.o hremote.o applic.o
2.3. TRACE32 Software 준비
TRACE32 S/W는 remote control 을 사용 하기 위해 API와 같은 환경설정을 해야 한다. “config.t32” 파일을 아래와 같이 수정하도록 한다.
|
;Environment Variables OS= ID=T32_1000021 TMP=C:\DOCUME~1\ADMINI~1\LOCALS~1\Temp SYS=C:\T32 HELP=C:\T32
; Standard License File used
;T32 API Access RCL=NETASSIST PORT=20001 PACKLEN=1024
;T32 Intercom ; not used
;Connection to Host PBI= USB
;Screen Settings: SCREEN= HEADER=TRACE32 API_REMOTE
;Printer Settings: PRINTER=WINDOWS |
PACKLEN 은 socket 통신을 위한 최대의 package length (byte) 를 넣어준다. 1024가 최대이다.
Port Number 는 API 통신을 위해 사용하는 UDP port 를 넣어준다. Default 는 20000이다. 이미 port 20000이 사용 중이기 때문에 20000보다 크게 설정한다.
2.4. API 환경 설정
T32_Config(), T32_Init() 과 T32_Attach() function 들에 의해서 API 환경 설정을 한다. T32_Config() 는 두 개의 변수를 가지며 node name과 port number이다. T32_Init() 은 통신 채널 셋업 설정을 한다. T32_Exit() 는 connection을 끊을 때와 application의 terminating 전에 항상 호출된다.
나머지 function들은 C:\T32\pdf\api_remote.pdf에서 확인 할 수 있다.
3. API 활용 방법
TRACE32 Remote API 은 상당히 많은 기능을 제공한다 여기에서는 그 중에 가장 많이 사용되는 API에 대하여 사용 방법 및 예제에 관하여 설명한다.
3.1. 타겟 상태 읽어 오기 : T32_GetState
|
Explanation |
현재 Target 보드의 상태가 Down/Halt/Stop/Running 인지를 확인 |
|
Prototype |
int T32_Getstate ( int *pstate ); |
|
Parameters |
pstate : ICD 상태 값을 Return 받을 변수 지정 |
|
Returns |
0 : Debug system 이 DOWN 상태 1 : Debug system 이 HALT 상태 2 : Target이 Break 에 걸려있는 상태 3 : Target이 Runnig 중인 상태 |
|
Example |
int state = -1;
error = T32_GetState ( &state ); /* no error handling, but state preset to detect problems */ printf ("System is "); switch (state) { case 0: printf ("down.\n"); break; case 1: printf ("halted.\n"); break; case 2: printf ("stopped.\n"); break; case 3: printf ("running.\n"); break; default: printf ("Error!\n"); } |
3.2. 타겟 CPU Reset : T32_ResetCPU
|
Explanation |
Target CPU 을 Reset 하기 위하여 내부적으로 SYStem.UP, Register.Reset 을 진행 |
|
Prototype |
int T32_ResetCPU ( void ); |
|
Parameters |
none |
|
Returns |
0 : 실행 성공 0 외의 다른 값 : Error 발생 |
|
Example |
error = T32_ResetCPU (); |
3.3. CMM 스크립트 실행 하기 : T32_Cmd
|
Explanation |
Powerview 에서 수행할 명령어 실행 |
|
Prototype |
int T32_Cmd ( const char *command ); |
|
Parameters |
command : 수행할 명령어 정의 |
|
Returns |
0 : 실행 성공 0 외의 다른 값 : Error 발생 |
|
Example |
error = T32_Cmd ( "Data.Set %Long 12200 033FFC00" ); error = T32_Cmd ( "Do test.cmm" ); *명령어에 대한 결과 메시지는 T32_GetMessage() API를 통해 확인 가능하다. |
3.4. 메모리 읽기 : T32_ReadMemory
|
Explanation |
Target 메모리부터 Data 를 Read 함 |
|
Prototype |
int T32_ReadMemory ( uint32_t byteAddress, int access, uint8_t *buffer, int byteSize ); |
|
Parameters |
byteAddress : Data를 읽어올 메모리 주소 번지 access : 메모리 접근 형태(클래스 * 0x0 : data memory) buffer : 전달 받은 버퍼 변수 byteSize ; 메모리에서 읽어올 Byte 수 |
|
Returns |
0 : 실행 성공 0 외의 다른 값 : Error 발생 |
|
Example |
// Read 16 bytes from address D:0x100
// 1) byte-addressed machine (e.g. x86, MicroBlaze, PPC) uint8_t buffer[16]; error = T32_ReadMemory (0x100, 0x0 /*D:*/, buffer, 16 /*bytes*/);
// 2) word-addressed machine using 16bit words (e.g. C2000) uint8_t buffer[16]; error = T32_ReadMemory (0x100 * 2 /*16bit*/, 0x0, buffer, 16 /*bytes*/); |
3.5. 메모리 쓰기 : T32_WriteMemory
|
Explanation |
Target 메모리부터 Data 를 Write 함 |
|
Prototype |
int T32_WriteMemory (dword address, int access, byte * buffer, int size); |
|
Parameters |
address : Data를 Write 할 메모리 주소 번지 access : 메모리 접근 형태(클래스 * 0x0 : data memory) buffer : Write 데이터의 버퍼 변수 size ; Write 할 Byte 수 |
|
Returns |
0 : 실행 성공 0 외의 다른 값 : Error 발생 |
|
Example |
unsigned char buffer[16]; error = T32_WriteMemory ( 0x100, 0xc0, buffer, 16 ); |
4. compile 환경설정
4.1. compiler 설치
① Visual Studio 2005 Professional 을 설치한다. (Visual Studio 2005 설치가이드 문서를 참고한다.)
② 설치 후에는 C:\Program Files<x86>\Microsoft Visual Studio 8 폴더를 확인 한다.
* 다른 compiler를 이용할 경우 GCC, Sun Compiler를 이용할 수 있다.
4.2. makefile 설정
① make file에는 설치된 compiler 환경에 따라 경로 설정을 변경해 준다.
② 경로 사이에 공백이 사이에 있을 경우 “” 로 처리해준다.
* 설치 후 기본 적인 make 파일은 다음과 같다.
|
# Microsoft compiler MSDIR=C:\Program Files\Microsoft Visual Studio .NET 2003\Vc7 INCDIR="$(MSDIR)\Include" INCDIR2="$(MSDIR)\PlatformSDK\Include" LIBDIR="$(MSDIR)\Lib" LIBDIR2="$(MSDIR)\PlatformSDK\Lib" MCC="$(MSDIR)\bin\cl.exe" -DWIN32 -DMS_WINDOWS -I$(INCDIR) -I$(INCDIR2) -I"..\src" MLINK="$(MSDIR)\bin\link.exe" /LIBPATH:$(LIBDIR) /LIBPATH:$(LIBDIR2) /OUT:$@
# GNU compiler # GCC=/usr/local/bin/gcc -ansi -Wall # GLINK=/usr/local/bin/gcc -o $@
# Sun compiler # SCC=/usr/ucb/cc -I/usr/openwin/include # SLINK=/usr/ucb/cc -o $@
LINK=$(MLINK) CC=$(MCC)
OBJ=hremote.obj hlinknet.obj hrtest.obj OBJ2=hrcmd.obj hlinknet.obj hremote.obj OBJ3=notifications.obj hlinknet.obj hremote.obj all: t32rem.exe hrtest.exe
notifications.exe : $(OBJ3) $(LINK) $(OBJ3) kernel32.lib wsock32.lib
t32rem.exe : $(OBJ2) $(LINK) $(OBJ2) kernel32.lib wsock32.lib
hrtest.exe : $(OBJ) $(LINK) $(OBJ) kernel32.lib wsock32.lib
hremote.obj : ../src/hremote.c ../src/t32.h $(CC) -c -o $@ ../src/hremote.c
hlinknet.obj : ../src/hlinknet.c ../src/t32.h $(CC) -c -o $@ ../src/hlinknet.c
hrtest.obj : hrtest.c ../src/t32.h $(CC) -c -o $@ hrtest.c
hrcmd.obj : hrcmd.c ../src/t32.h $(CC) -c -o $@ hrcmd.c
notifications.obj : notifications.c ../src/t32.h $(CC) -c -o $@ notifications.c |
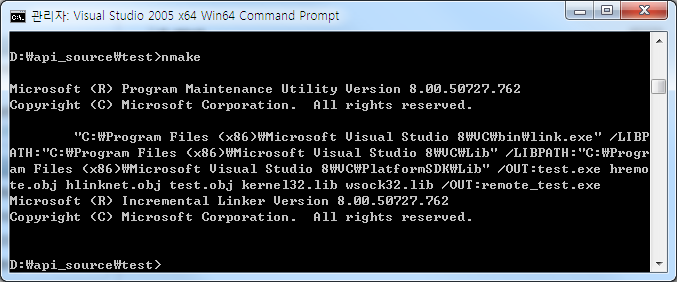
4.3. build 하기
① cmd를 이용해 build 한다.
② Source가 설치 된 경로로 이동해 nmake 하면 된다.
③ Exe 파일이 제대로 생성이 되었는지 확인한다.
5. API 사용하기
5.1. TRACE32 start
① config.t32 수정 후 t32marm.exe 를 실행한다. (C:\T32)
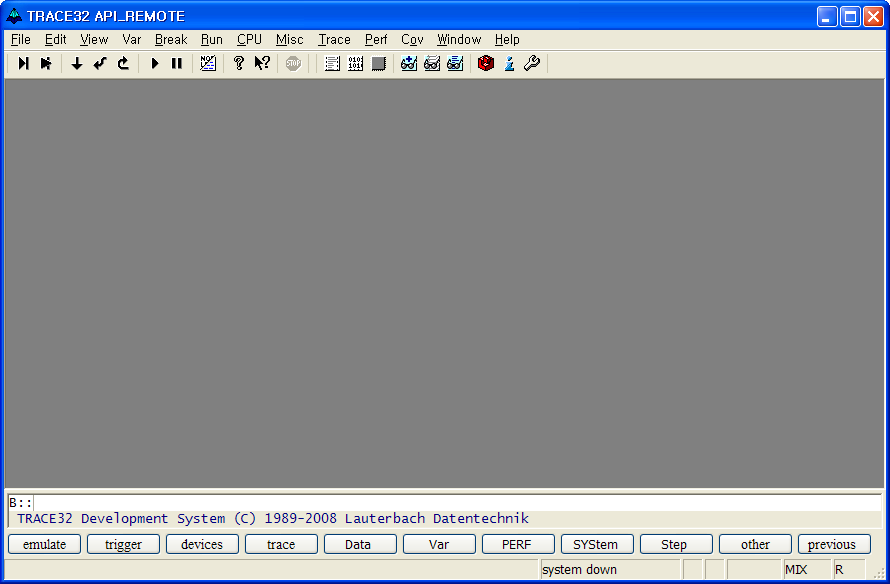
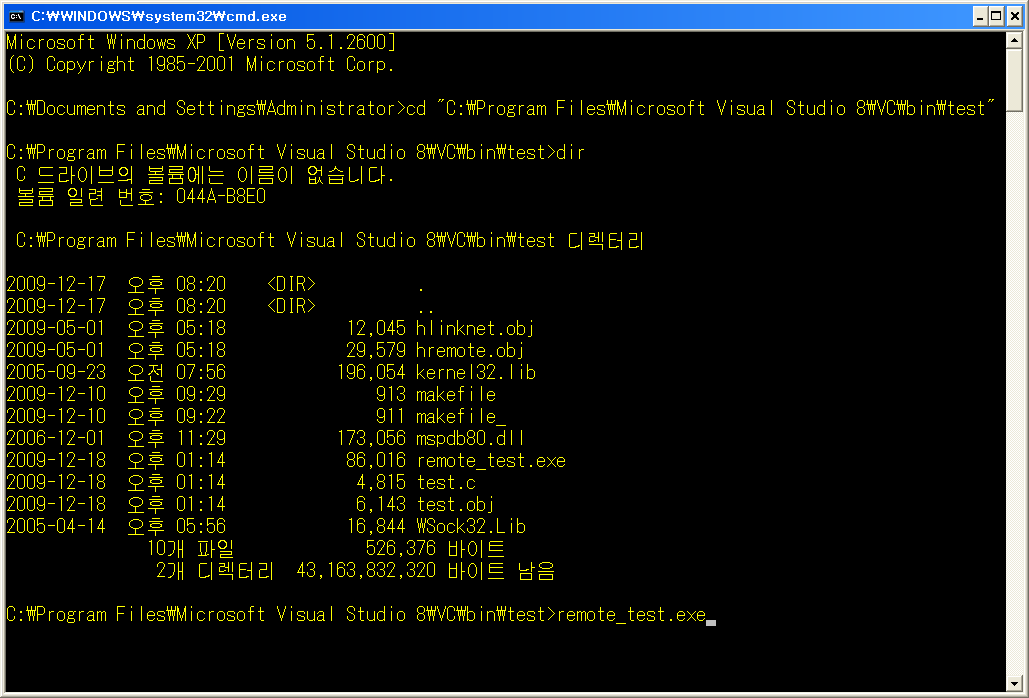
② compile이 완료 된 exe 파일을 실행한다. 위의 ①②의 실행 순서에 주의 하도록 한다.
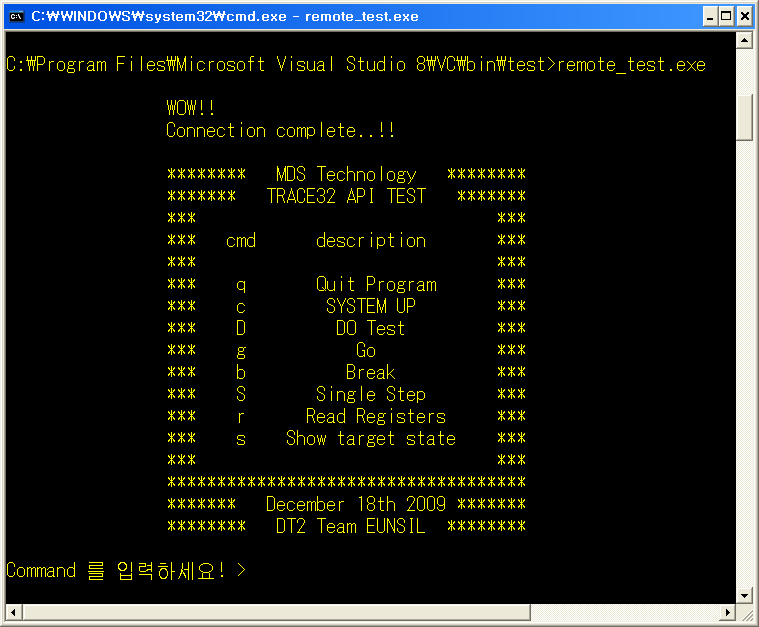
<API command>
|
Command |
Description |
|
q / Quit Program |
API 프로그램 종료 |
|
c / System Up |
Target 연결. System up |
|
D / Do Test |
Test.cmm 실행 |
|
g / Go |
Target running |
|
b / Break |
Running 중인 target break |
|
S / Single Step |
Stepping debugging |
|
r / Read Registers |
Register 값 read |
|
s / Show target State |
현재 target status 표시 |
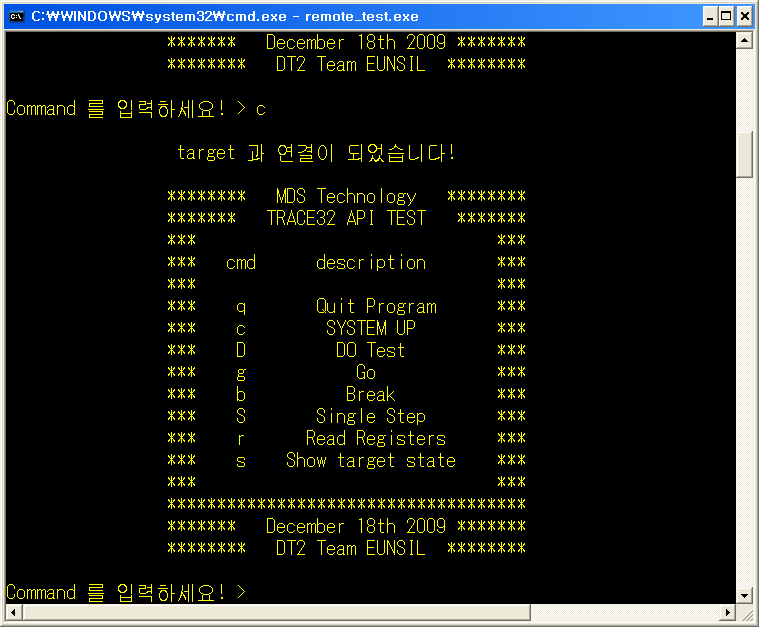
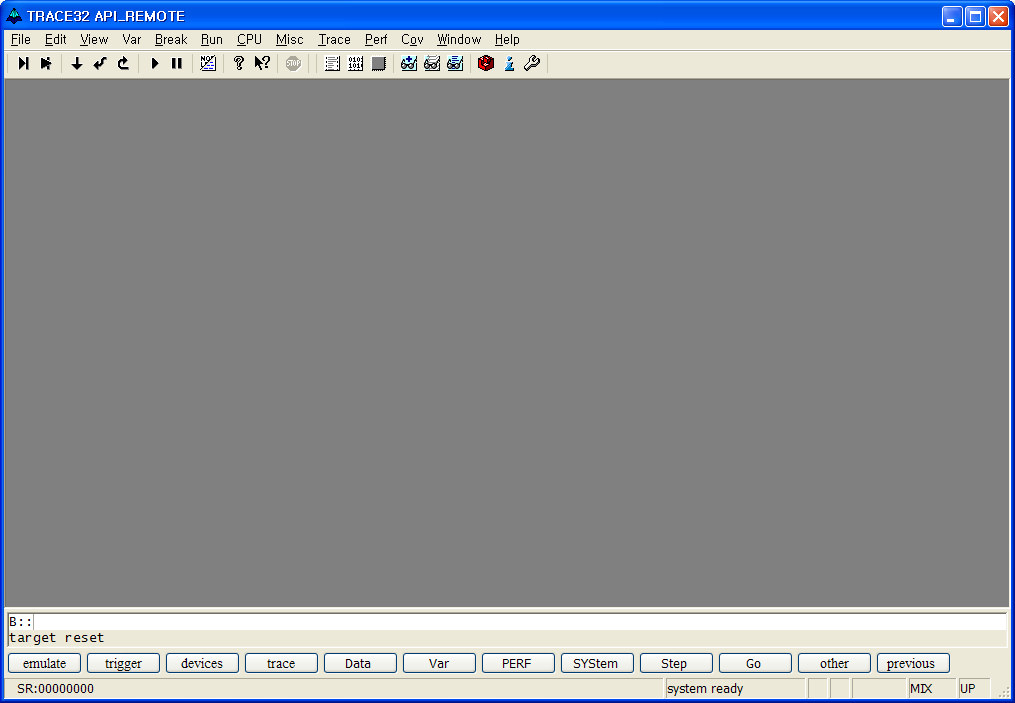
③ c / system up 실행
연결이 제대로 되면 cmd 창에는 target과 연결이 되었습니다. 라는 메시지가 뿌려지고, PowerView에는 system down에서 system ready로 target state가 변경이 되는 것을 확인 할 수 있다.
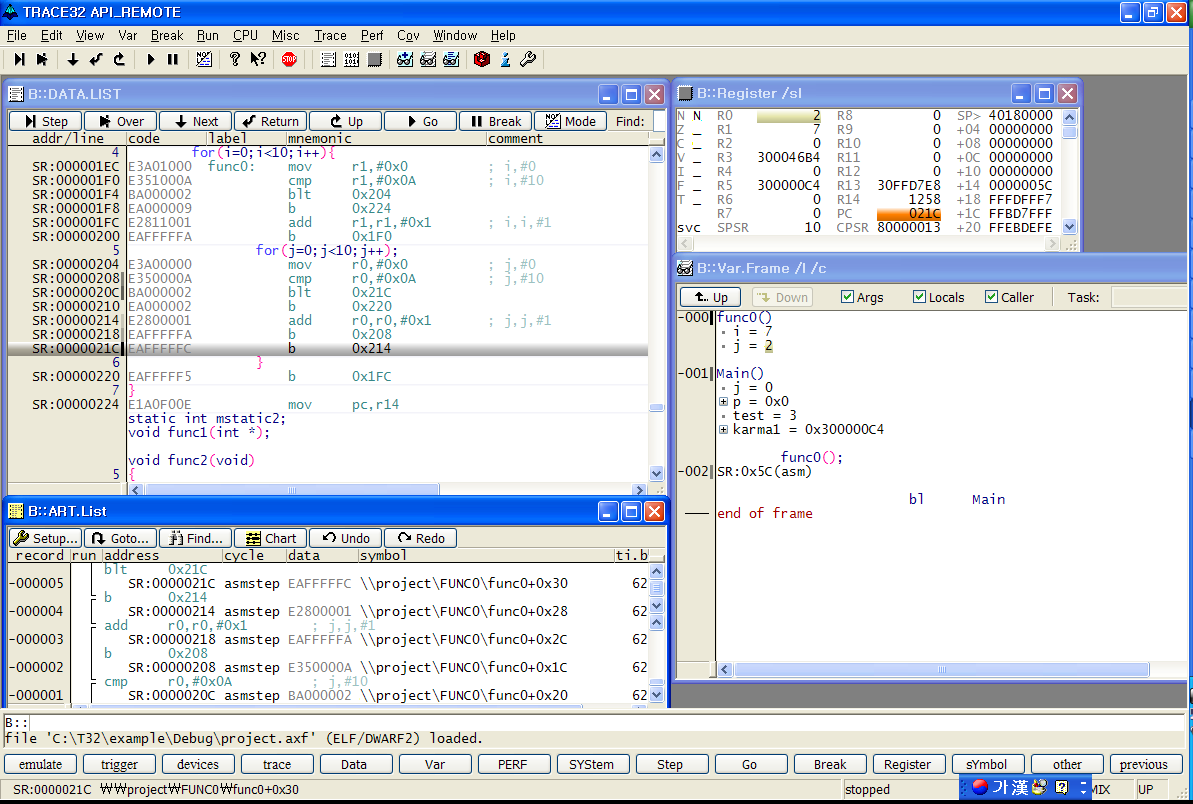
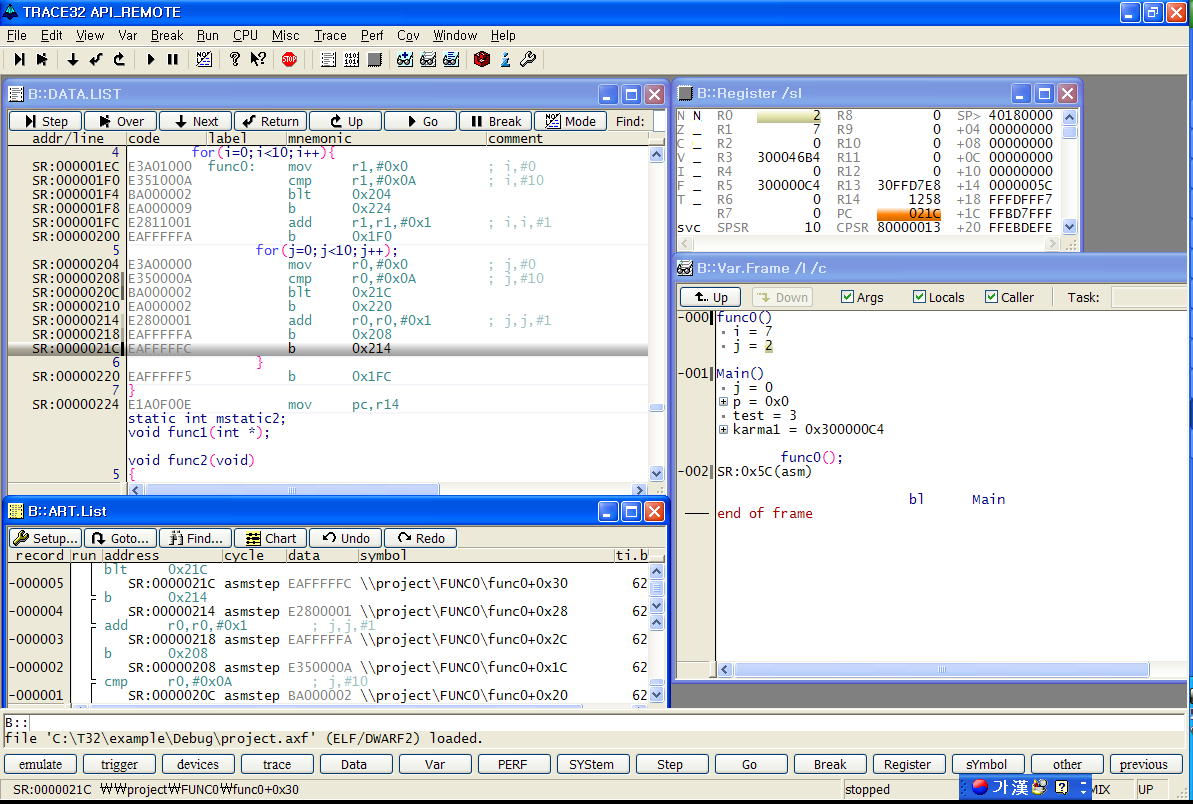
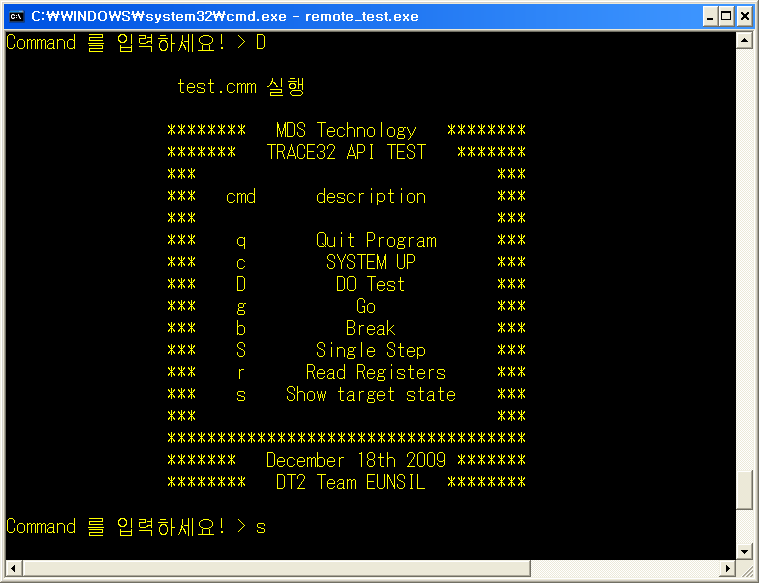
④ D / test.cmm 을 실행
미리 만들어 둔 test.cmm 을 실행 시킨다. cmm으로 작성 할 수 있는 부분은 미리 셋팅하여 저장해 두고 cmm을 API에서 바로 실행 시킬 수 있다.
⑤ g / Go
Target을 running 시킨다. PowerView에서 Go 하는 동작과 동일하다.
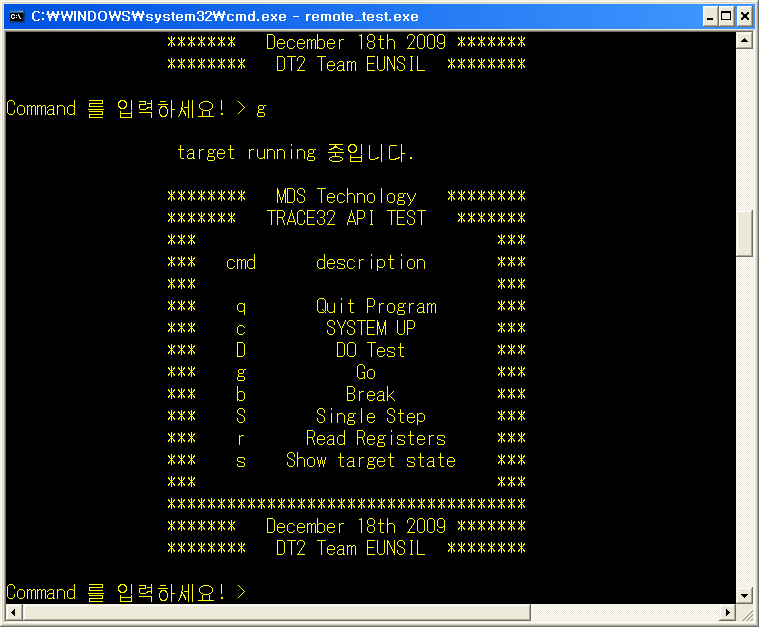
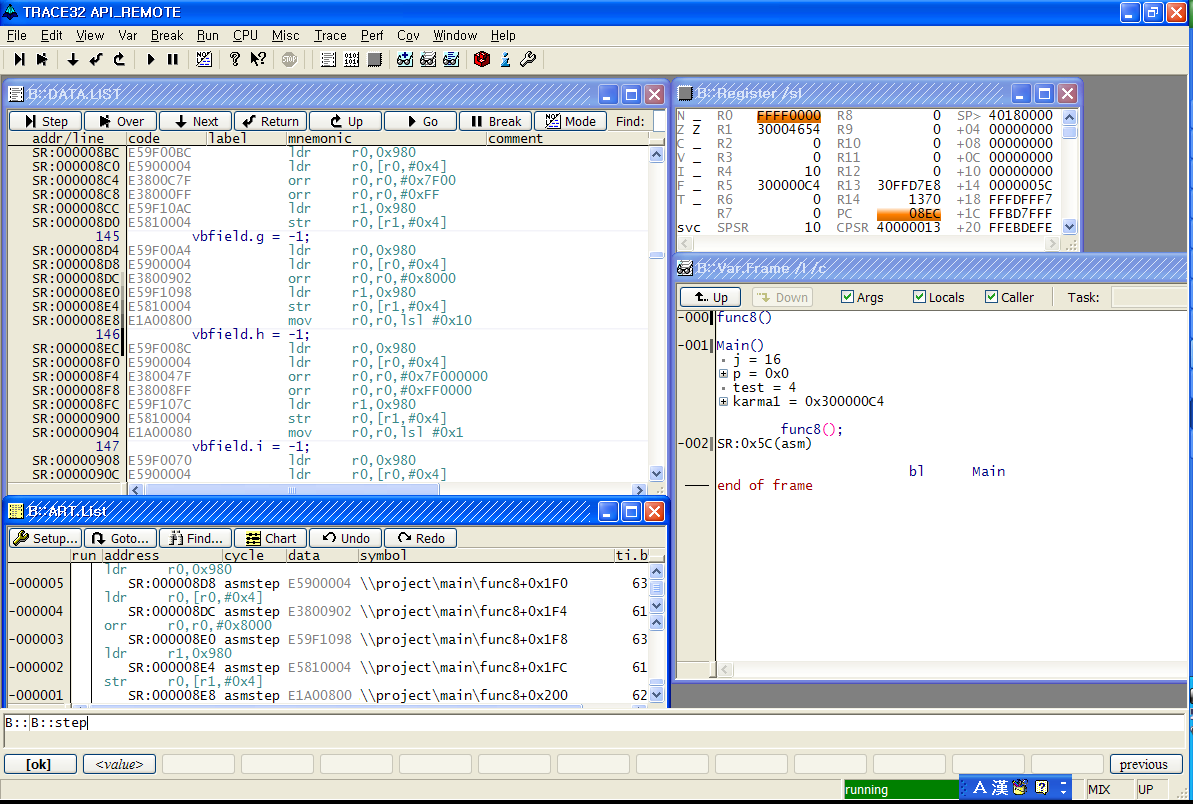
⑥ b / Break
running 중인 target을 break 시킨다. PowerView에서 Break 하는 동작과 동일하다.
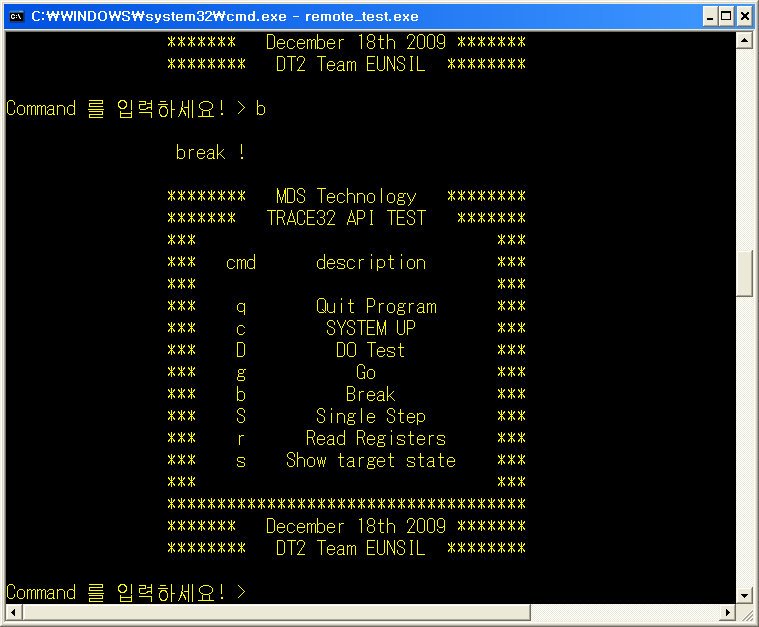
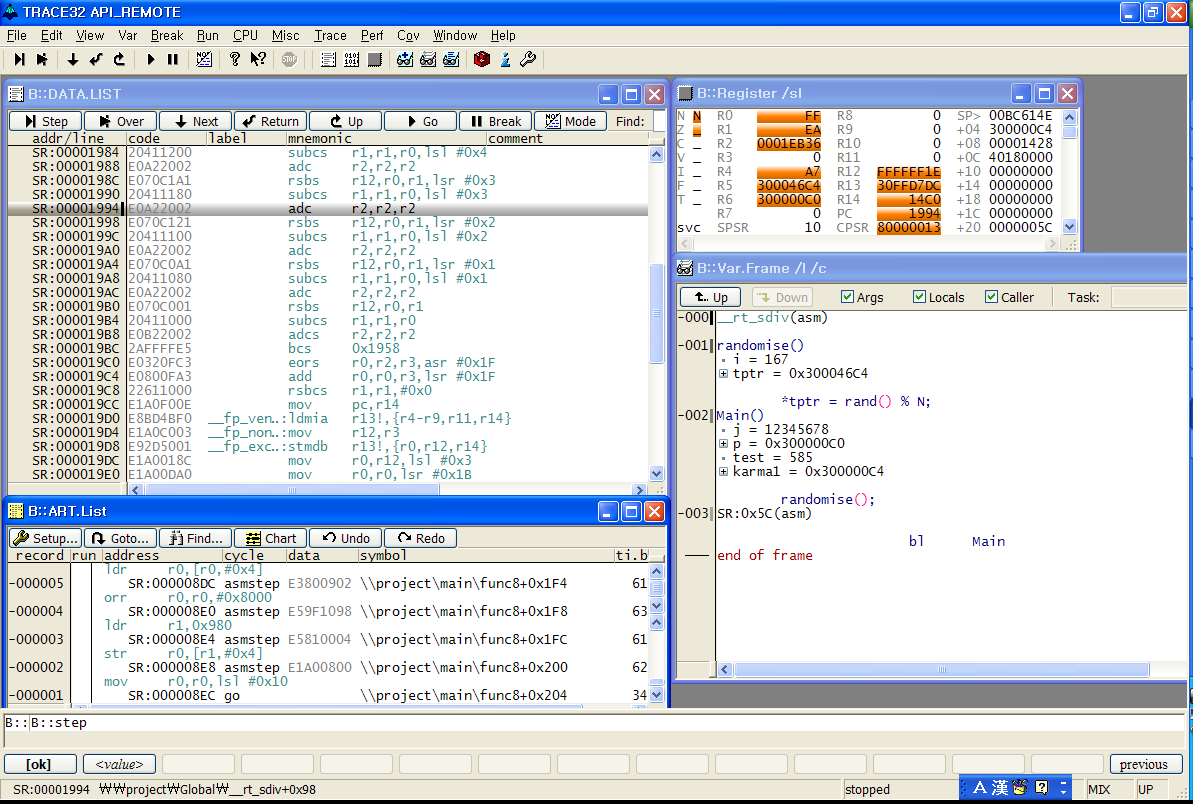
⑦ S / Single Step
instruction을 한 구간씩 수행한다. Stepping 디버깅이 가능하다.
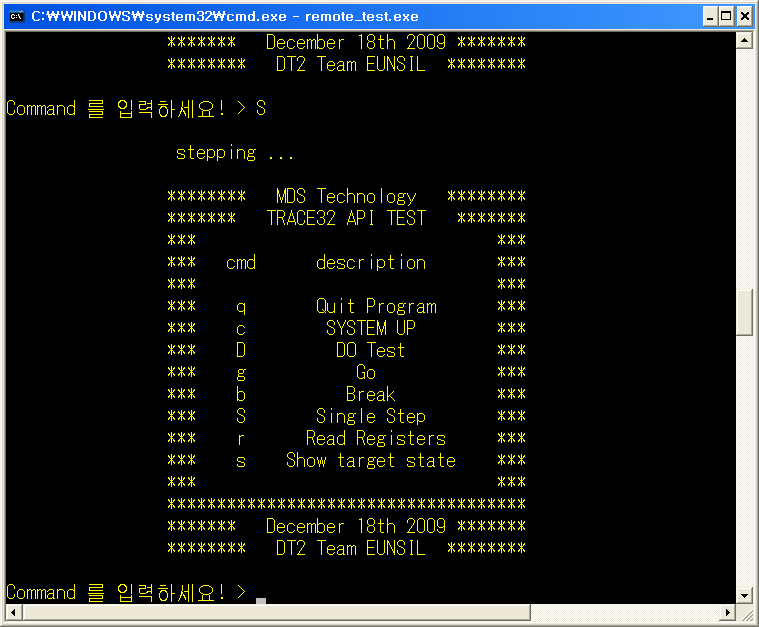
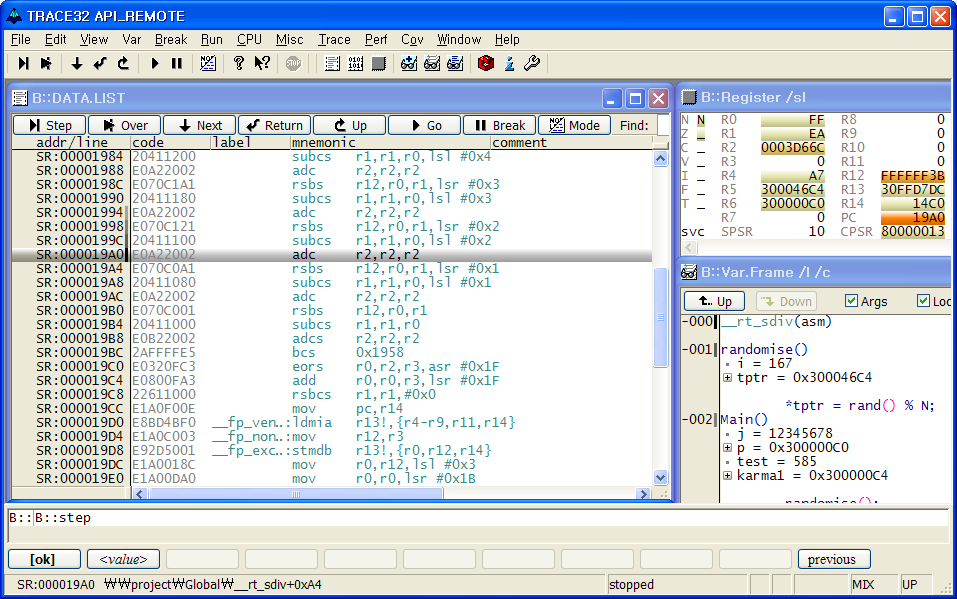
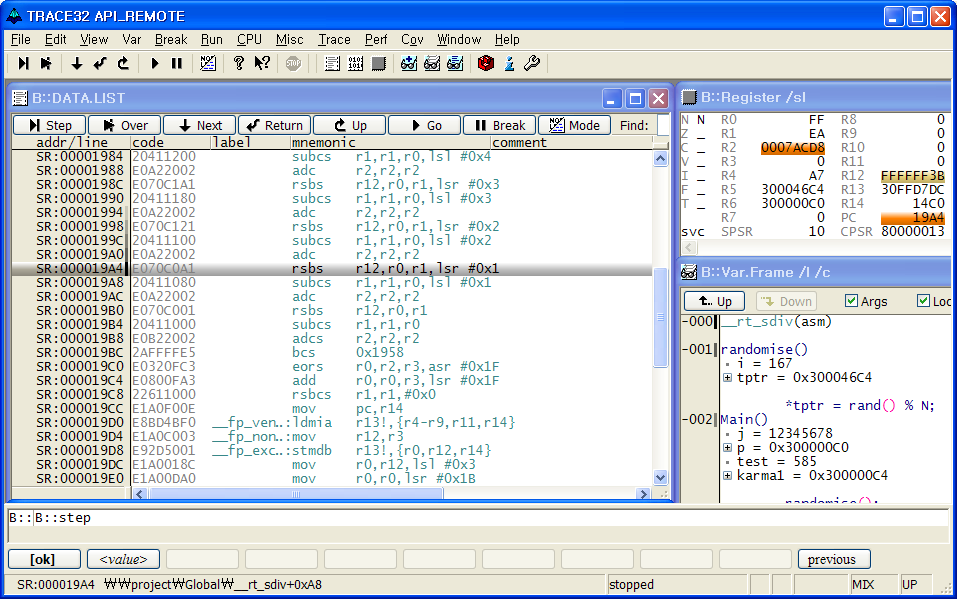
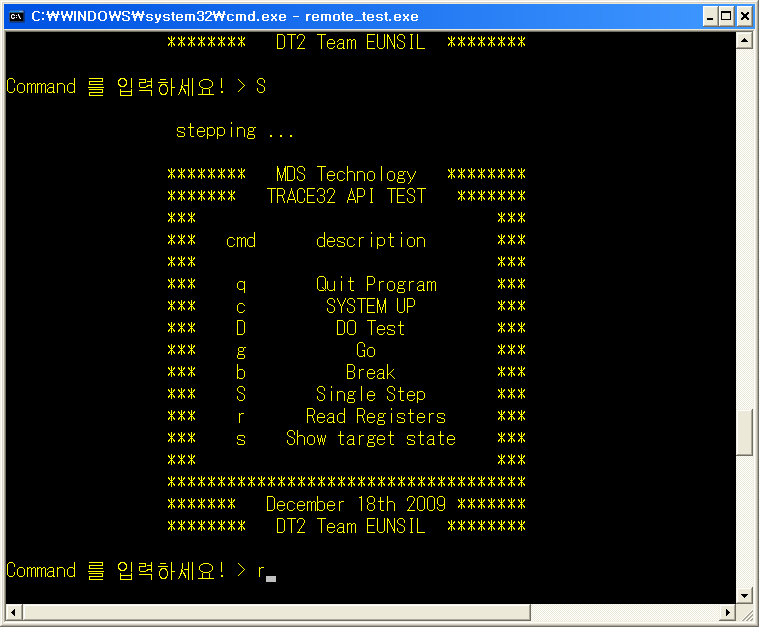
⑧ r / Read Registers
현재 멈춰져 있는 address에서의 register 값을 read 한다. PowerView상에서 보이는 Register값과 동일하다.
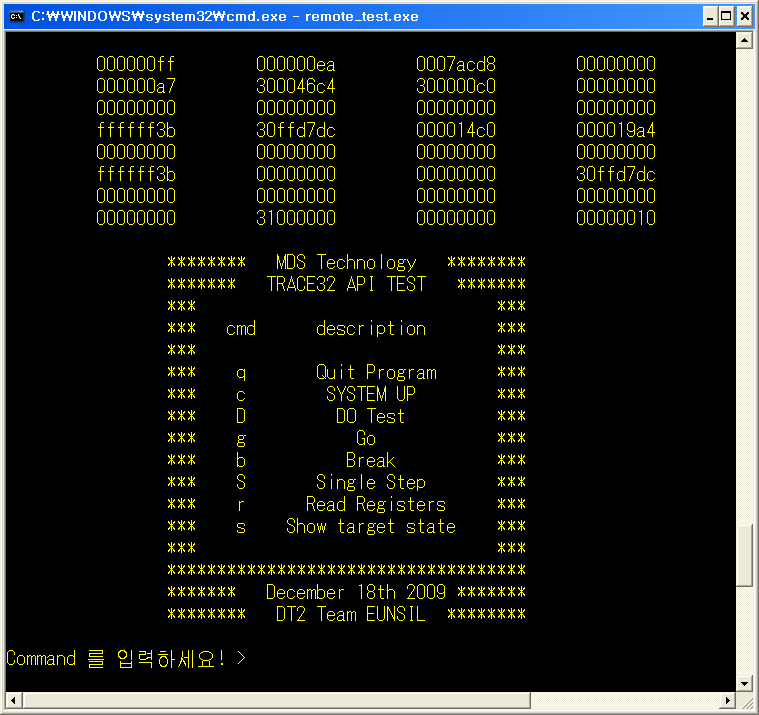
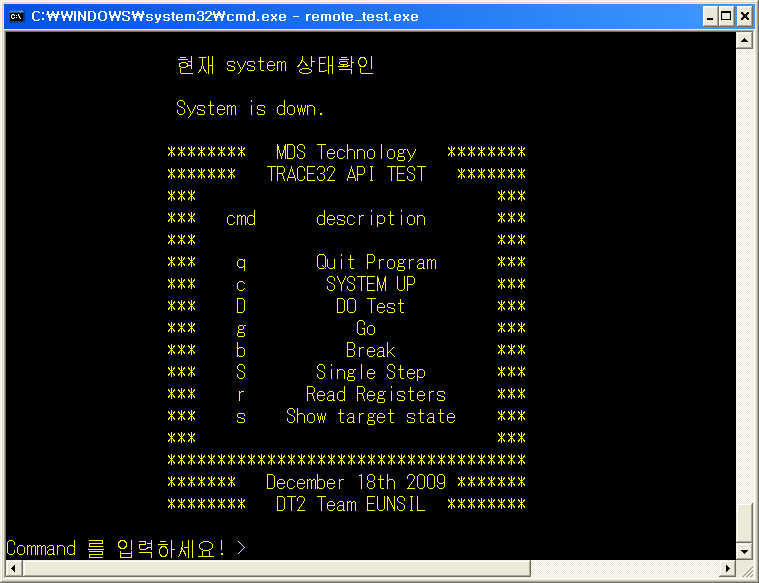
⑨ S / Show target State
현재 target의 status를 알려준다. PowerView 하단에 나와 있는 status로 확인 할 수도 있다. 기본적으로 down, halted, stopped, running 의 네 가지 상태를 알려준다.
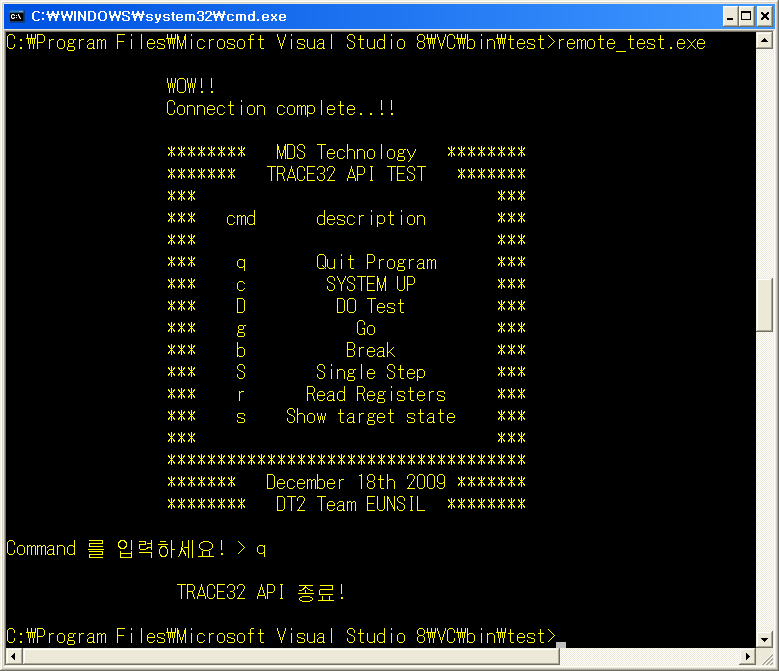
⑩ q / Quit Program
API 프로그램을 종료한다.
6. Supported Tool Integrations
TRACE32 SW 설치할 때, Integration 하는 3rd party Tool 설정이 가능하다.
TRACE32 SW(Powerview) 설치시 아래의 부분 선택하여 설치한다.
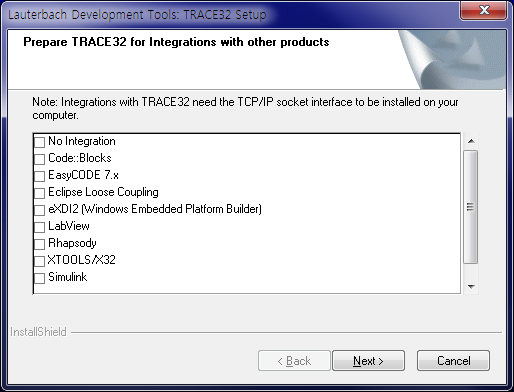
위의 설정 외에도 지원된 Tool은 아래의 경로 T32\demo\env 에서 확인 가능하다.
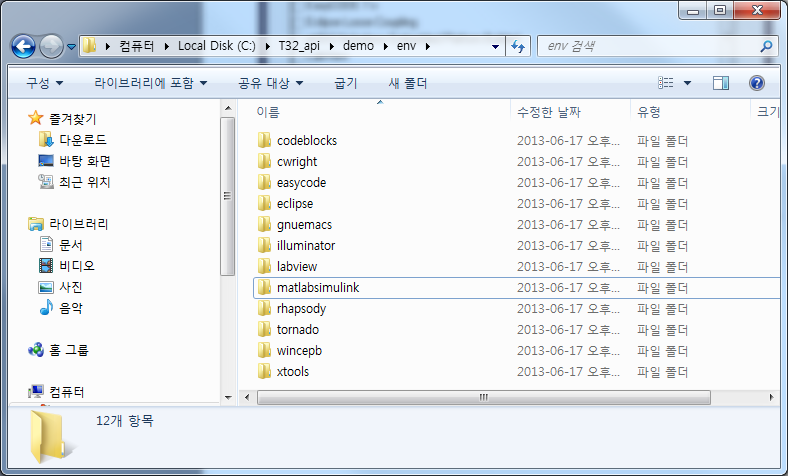
Ex) LabVIEW – int_labview.pdf 참고
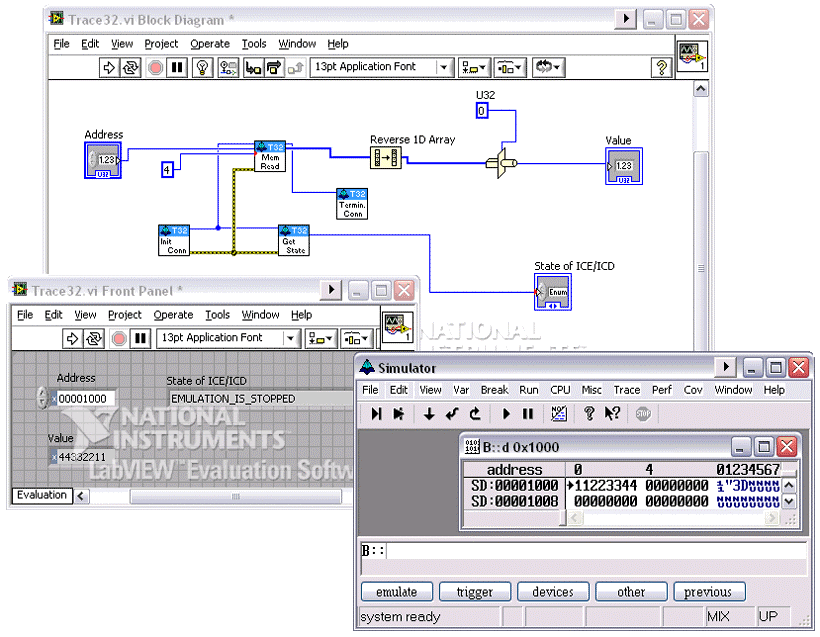
- Virtual Instruments in LabVIEW for TRACE32
- Control Target Execution within LabVIEW
- Use Memory Accesses as Input or Output Channels
- Use Target Hardware as Data Processing Unit
- No Need for External Communication Interface

