GTL setup for Emulator debug
GTL Configuration
Emulator Debug 환경에서는 기본적으로 개발환경에 따라 다음 3가지 환경을 구성할 수 있습니다.
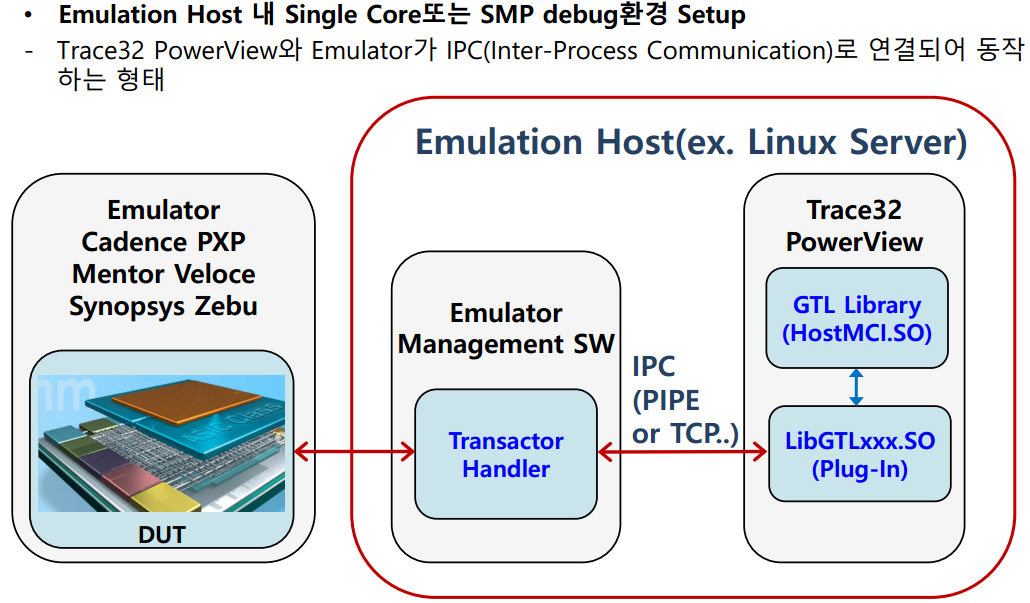
1) SMP 또는 Single core debugging 환경 : 아래 Configuration 1 참조
- 가장 간단하며 Emulation Host와 TRACE32 PowerView가 같은 Host상에 위치합니다.
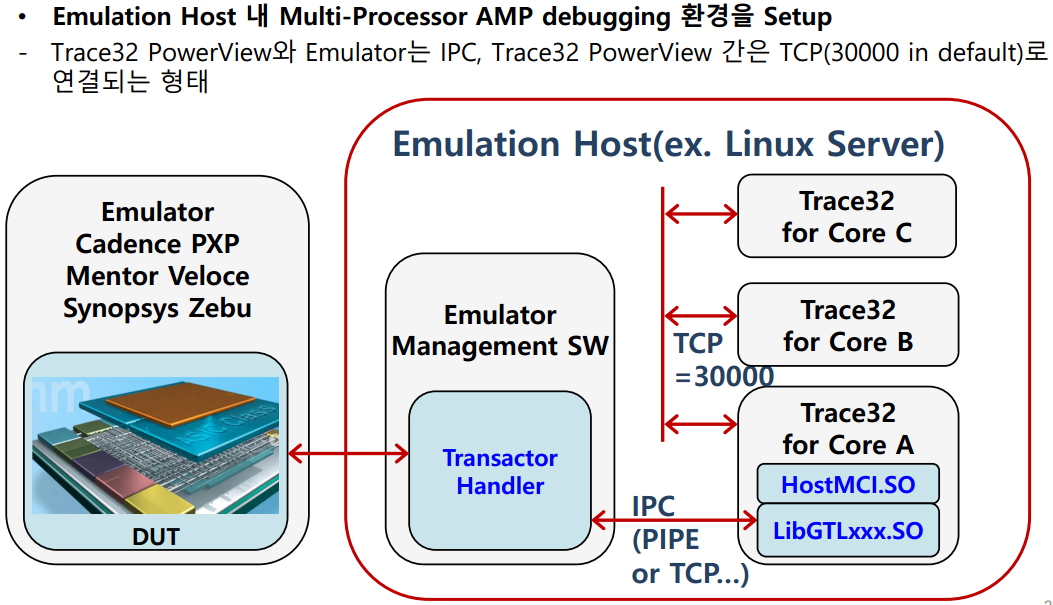
2) AMP debugging 환경 : 아래 Configuration 2 참조
- Emulation Host와 TRACE32 PowerView가 같은 Host상에 있으나 AMP 지원을 위해 여러개의 PowerView를 실행합니다.
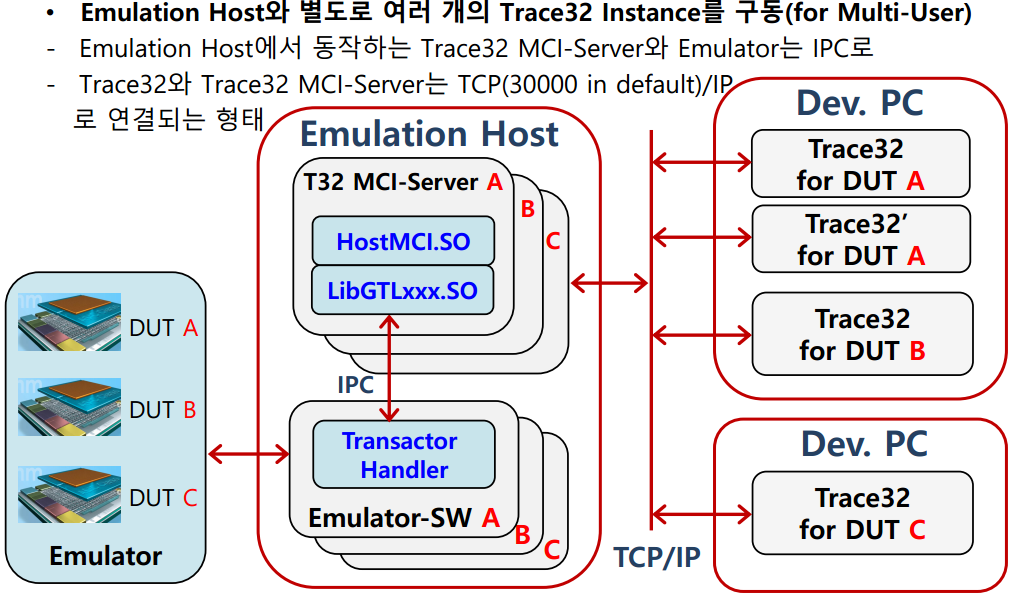
3) AMP debug 환경 및 Network Access debugging : 아래 Configuration 3 참조
- Emulation Host와 TRACE32 PowerView가 각각 별도의 Host에서 동작하므로 Network을 통해 연결됩니다. 따라서
TRACE32 PowerView를 개발자 PC에서 실행하여 연결할 수 있으므로 매우 간편하게 사용할 수 있습니다.
-
Configuration 1
-
Configuration 2
-
Configuration 3
GTL debug environment 설정
상기 3가지 동작 Mode는 TRACE32 실행 시 기본적으로 참조하는 config.t32 파일의 PBI 설정에 따라 결정되며
각 동작 Mode의 설정은 다음과 같습니다.
-
Setup for Configuration 1
PBI=MCILIB ; configure system to use hostmci.so
-
Setup for Configuration 2
PBI=MCISERVER ; set up the usage of hostmci.so and open
PORT=30000 ; server at 30000 for the first instance.
INSTANCE=AUTO ; consecutive number of instance for AMP setup
-
Setup for Configuration 3
>> ./t32mciserver port=30000 ; start t32mciserver at port 30000
PBI=MCISERVER ; set up connection to t32mciserver
NODE=192.168.0.1 ; connect to IP 192.168.0.1
PORT=30000 ; at port 30000
INSTANCE=AUTO ; consecutive number of Trace32 instance for AMP setup
TRACE32 PowerView 실행 후 Emulator 연결
TRACE32 사용 시 Physical JTAG 디버그 환경과 다른 점은 오직 Emulator 연결을 위한 설정만 다릅니다. 즉 기존에 사용하던
.cmm Script들을 그대로 사용할 수 있으며 GTL관련 내용만 추가하면 되겠습니다.
-
Physical JTAG 디버그 환경에 GTL을 사용하기 위해 추가할 설정
아래 기술된 내용 중 밤색 구문들은 GTL환경에서 emulator와 연결하기 위한 설정입니다.
SYStem.CONFIG.DEBUGPORT GTL0
;SYStem.GTL.DISCONNECT ; disconnect if still connected
;SYStem.GTL.MODELCONFIG "TIMEOUT=10|PORT=20000|NODE=127.0.0.1|PACKLEN=1024“ ; optional
;SYStem.GTL.MODELNAME "jtag_gtl_bfm“ ; optional
SYStem.GTL.LIBname "lib_gtl1.so“
SYStem.GTL.JTAGPROBENAME “JTAGProbe0” ; for JTAG transactor
; SYStem.CONFIG.* ; ARM specific command
;SYStem.CONFIG.DAPNAME “SWD_DAP0“ ; for DAP transactor
;SYStem.CONFIG.DEBUGBUSNAME "APB_DAP0“ ; for APB transactor to debug, DAP: class
;SYStem.CONFIG.MEMORYBUSNAME "AHB_DAP0“ ; for AHB transactor for real time access(E:)
;SYStem.CONFIG.APBNAME “APB_DAP0” ; define APB transactor for APB: class
;SYStem.CONFIG.AXINAME “AXI_DAP0” ; define AXI transactor for Z(N)AXI: class
;SYStem.CONFIG.AHBNAME “AHB_DAP0” ; define AHB transactor for Z(N)AHB: class
; optional for below
;SYStem.GTL.DMANAME “DMA_transactor” ; define DMA transactor for Data.LOAD * /GTLDMALOAD
;SYStem.GTL.TransactorConfig “user defined string for transactor configuration” “User String”
SYStem.VT.TimeinTargetTime ON ; Select the time ref. between Host and Target(Emulator) for Timeout
SYStem.VT.PauseinTargetTime ON ; Select the time ref. between Host and Target for Wait()
;SYStem.VT.HardwareTimeout ON ; ON(Enable), En/disable Transactor operation timeout
;SYStem.VT.TimeScale 1.0 ; Time scale for Timeout and Wait(), wait time=TS*PS*timevalue
;SYStem.VT.PauseScale 1.0 ; Time scale for Wait(), wait time=TS*PS*timevalue
;SYStem.VT.HardwareTimeoutScale 1.0 ; prolong/shirink Transactor opearation timeout
;SYStem.VT.MaxTimeout 10us ; absolute maximum time for Timeout
;SYStem.VT.MaxPause 10us ; absolute maximum time for Wait() time
SYStem.GTL.CONNECT ; connecting GTL-plug-in
SYStem.CPU CortexA7MPcore
SYStem.CONFIG COREBASE 0x80090000
SYStem.CONFIG.DEBUGACCESSPORT 1.
SYStem.JtagClock 300KHz
SYStem.Option.ResBreak OFF
SYStem.Option.EnReset ON
SYStem.Option.WaitReset 100.ms
SETUP.UpdateRATE 3s
MAP.UpdateOnce ; TRACE32 updates the data of the opened window only one time
MAP.NoUpdateOnce 0x10008000++0xFFF ; define normal update area
SYStem.DETECT.DaisyChain ; connecting GTL-plug-in, if GTL is not connected
SYStem.Mode.Up ;or SYStem.Mode.Attach ; connect the emualtor targe(DUT)
ENDDO
위 Script를 실행하게 되면 Emulator내에서 Emulation되고 있는 Core가 연결되게 됩니다.
-
느린 Emulator 환경에서 유용하게 사용할 수 있는 Optimization Command
TRACE32 PowerView는 개발자로 하여금 타깃의 현재 상태를 명확히 볼수 있도록 내부적으로 초당 수십회의 타깃 상태정보를 읽어
윈도우 창을 Update하게 됩니다. 이러한 Emulator와 같은 특수한(느린) 환경에서 원활한 디버그 환경으 최적화 할 수 있도록 다음과
같은 명령들을 제공하고 있습니다.
SETUP.UpateRATE [time|value]
-SETUP.URATE 250ms ; Screen will be updated every 250ms
-SETUP.URATE 4 ; 4 times per second
SYStem.POLLING SLOW
-System state is polled slowly, SYStem.POLLING DEFault in default
MAP.UpdateOnce [address range]
-Only one time update for specified address after Break and Step/Over/Go till
-Used for memory area
-
MAP.NoUpdateOnce [address range]
-Depend on SETUP.URATE command for the address range
-Used for SFR area
Data.LOAD.ELF *.ELF /VM
-Load executable file to VM: area only
-
Data.LOAD.ELF *.ELF /PlusVM
-Load executable file to both target and VM: memory
Data.LOAD.ELF *.ELF /GTLDMALOAD
-Load executable file to the address via DMA transactor(Backdoor)
Data.List VM:
-Data.List window accesses only VM: memory
Onchip.Access VM
-Use the code in VM: memory for trace analysis
